NOTE: This user guide is how to track expenses and then close them in a Reporting Period (for programs that receive advance(s) payment requests). Check your program specific guidelines to determine how your advance(s) is paid out and expenses reported.
Table of Contents
| Overview |
| 1) Create Expenses |
| 2) Review Expenses |
| 3) Create Reporting Period |
| 4) Submit Reporting Period |
| 5) Mark Budgeting Tracking Period Task as 'Complete' |
Overview
This guide describes how to report expenses by submitting them in a Reporting Period. There are five basic steps:
Attachments
Below is a summary of where you will and won’t add attachments to during this process:
- Expense(s) (Attachments tab) – Source Documentation and Proof of Payment
- Reporting Period – No Attachments
Navigate to Award
To navigate to your award: Grant Management (left navigation) > Grants > [Select Award].
View this user guide for more information, 'View List of Awards / Navigate to an Award'.
Budget
You will add expenses to track against your Budget.
View this user guide to learn how to interpret your budget, 'Understanding your Budget'.
Expenses
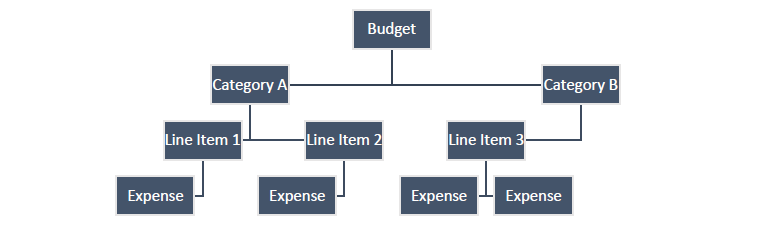
In AmpliFund, expenses will be allocated to line items. Line items will be allocated to Budget Categories.
Create Expenses
Step 1: Navigate to your Award.
Video Instructions
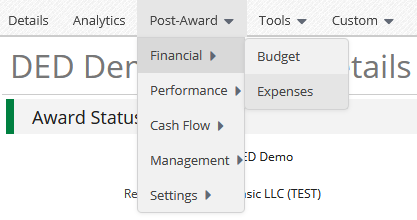
Step 2: Left Click Post-Award (top tab) > Financial > Expenses
Step 5: Complete the General tab on the expense pop-up.
General tab
| Grant: | Verify this is selected to the correct Award. |
| Category: | Choose the category in the dropdown menu. |
| Line Item: | Select Line Item. Dropdown is pre-populated from what line items are in the chosen category. |
| Direct Cost: | Enter the amount for the Expense (Grant Funds + Match). |
| Expense Date: | Select the Date of the Expense (e.g. Invoice Date). |
| Expense Status: | Select Reviewed. |
| Payee: | Optional; you can leave this as Other and leave Payee Blank. If you wish to track your vendors/contractor/firm, use the dropdown, or choose 'Create'. |
| Description: |
Add in a detail that identifies the expense, (e.g. invoice number and/or brief description) |
Financials tab
| Cash Match Amount: | If this expense has Cash Match. Select the Dollar button, and enter in the amount. This can be left as $0 if the expense is not using this match. |
| In-Kind Amount: | If this expense has In-Kind Match. Select the Dollar button, and enter in the amount. This can be left as $0 if the expense is not using this match. |
Step 7: Complete the Attachments tab on the expense pop-up.
Attachments tab
| Attachments: | Click the 'Choose file(s)' button, and select the files from your computer. Attach your Source Documentation and Proof of Payment here. |
- Source Documentation: An original record that provides detailed evidence of a financial transaction or business activity. Examples include receipts, invoices, timesheets, and purchase orders. These documents are crucial for recording and verifying the transaction.
- Proof of Payment: Documentation that confirms that the payment has been successfully completed. Examples include canceled checks, bank statements specifically showing the payment transaction, debit or credit card payment confirmations, wire transfer receipts, or ACH transfer confirmations. Proof of payment verifies that the payment associated with the source document has been made.
- Note: It is important to provide different documents for source documentation and proof of payment. Source documentation provides evidence of the transaction details, while proof of payment confirms that the payment has been executed.
NOTE: If you have Program Income or Revolving Loan funds, please view this user guide ,'How do I Enter Program Income or Revolving Loan Funds on Expenses?', to enter it correctly on the 'Custom' tab of the expense.
Step 8: Click Create to add that expense.
Step 9: Repeat Steps 4-8 until your expenses have all been entered.
Edit/Delete Expenses
To edit an expense after creation, click the Pencil icon next to the description, make changes, and click Save.
NOTE: Expenses that are associated with a submitted Reporting Period cannot be edited. If the 'closed' expense needs to be edited, notify your Program Rep.
To delete an expense or more than one, select the expense row(s) then click the Trashcan icon.
Review Expenses
NOTE: See your Program Guidelines for guidance on how your budget is used and if it is permissible to go over in line items and/or budget categories expense amounts.
Step 10: To verify your expenses grant funds/match amounts are correct and the overall balance of your Award, please use the Grant Budget Variance report OR view your budget and add the "Actuals" and "Remaining" columns.
Create Reporting Period
After all Expenses have been created, you must create a Budget Reporting Period. To create a
Reporting Period:
Video Instructions
Step 11: Go to the Award Screen > Post-Award (tab) > Management > Reporting Periods
You are now on the Reporting Period Grid.
NOTE: If there the Reporting Period has already been opened (or rejected) for that same specific date range, skip Step 12-13. Left click the already opened/rejected link, and start on Step 14.
Step 12: Click the + icon (top right) to create Reporting Period.
Step 13: On the Reporting Periods screen, select Expenses. Select the Time Period for the report you would like to complete. Click Save.
Step 14: Verify the Overall Expense Details section is accurate.
| Total Expense Amount for Period: | This is the total expense cost you are going to submit. |
| Number of Unreviewed Expenses: | Verify this is 0. If it is not 0, that means you have an expense within the date range that is not marked 'Reviewed' as its expense status. |
| Comments: | Leave Blank. |
| Attach Documentation. |
Leave Blank. |
Step 15: Verify the Expenses Closeout section has 'Select All' selected.
If expense(s) needs to be edited:
- Go back to the Expense Grid (Step #2).
- Edit/Save the expense.
- Navigate back to the Reporting Period grid, and click on the 'Open' Budget Reporting Period (You will not create a new reporting period). The Reporting Period is now refreshed with the updated Expense information (Step #11).
Submit Reporting Period
Step 16: To 'Submit', click Close. Click Save if you want to submit later.
NOTE: This will create an automatic email to your Program Rep that you have submitted this Reporting Period.
Reporting Period Notification
The Award's Recipient Grant Manager will only receive an email notification if the Reporting Period has been 'rejected' by your Program Rep. There is not an 'approval email.
Found Expense After Reporting Period Is Closed
If you have an item that should have been included in a previous Reporting Period, include it in the most recent Reporting Period you can. The date of the expenses can be from a 'Closed' Reporting Period. If it is marked as 'Reviewed' status, it will roll-up into the next one.
Mark Budgeting Tracking Period Task as 'Complete'
NOTE: Some programs will not have Tasks for completing Reporting Periods. If after completing Step 17 you do not see the corresponding task, skip Step 18.
After closing your reporting period now mark your Task as complete.
Step 17: Go to the Award Screen > Tools (tab) > Tasks
Step 18: There are 3 ways to mark a Task as complete:
Option 1: Select the specific Task and use the Mark as Complete checkmark icon under Actions.
Option 2: Click the Checkmark icon on the Task row.
Option 3: Click into the Task Name to see the description, and click the Mark as Complete checkmark
icon in the top right corner.
After marking the Task as complete, the Task Status will be “Completed”.